<!--
- @Description: In User Settings Edit
- @Author: 临时工
- @Date: 2019-08-31 19:49:08
- @LastEditTime: 2020-02-26 14:39:22
- @LastEditors: Please set LastEditors -->
前言
根据我们前面的几个章节内容可知,目前可以通过两种方式进行入网操作:
PB-GATT
主要用于那些不具备PB-ADV特性的设备,间接地加入SIG Mesh网络,如手机、平板电脑等等;前提是未启动配置的设备即Unprovisioned device,使能了proxy特性;
PB-ADV
通过ADV承载的方式,将未启动配置的设备加入SIG Mesh网络,多用于携带有SIG Mesh协议栈的设备;
那么,本章节主要讲解如何通过PB-GATT的方式,将unprovisioned device加入SIG Mesh网络。至于PB-ADV相关的话题,我们放在下一章节进行详解。

入网流程
对SIG Mesh的入网流程,我想大多数只知道如下的五个步聚:
- 发送Beacon信号
- 邀请
- 交换公共密钥
- 认证
- 启动配置数据分发
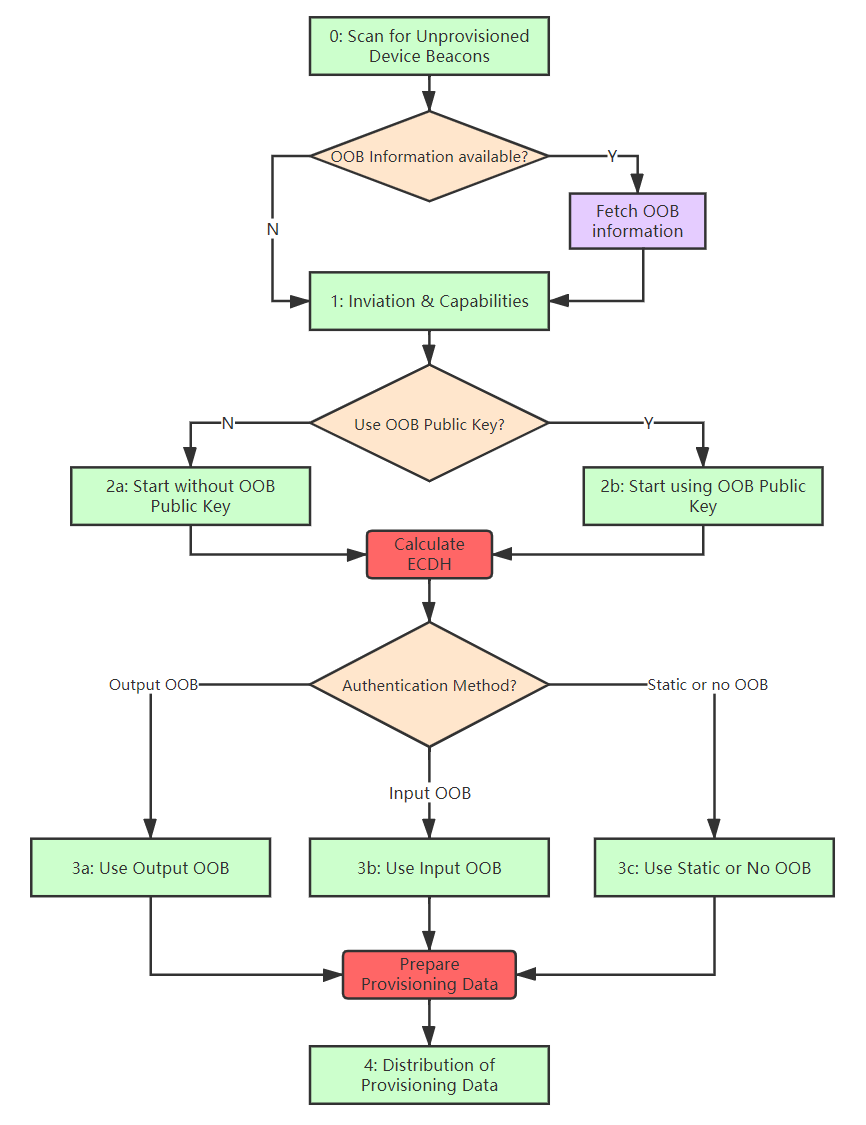
然而,真实地使用中这些步骤又细化成很多小的细节。那么,这些细小的细节到底又是怎么样的?详情如下图所示:

从上图可知,整个入网的过程还是比较复杂了,做了这么多交互就是为了最终的provisioning data中的值。在new device向provisioner发送provisioning complete PDU之后,new device华丽地转身为Node。接下来,让我们庖丁解牛一层一层地去揭开它们的真面目。
Mesh Provisioning Service
在开始剖析这五个入网步骤之前,小编觉得还是有必要先了解一下什么是mesh provisioning service,该服务主要就两个特征值:
mesh provisioning data in (Write Without Response)
该特征值主要用于provisioning client向provisioning server发送provisioning pdu
mesh provisioning data out (Notify)
该特征值主要用于provisioning server向provisioning client发送provisioning pdu
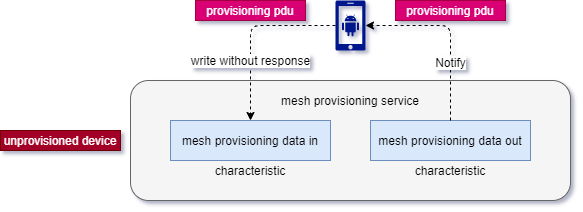
从上图的描述,provisioning pdus的交互都是在provisioning service中进行的。mesh provisioning data in与mesh provisioning data out中的进和出的参照物是设备本身;该服务的作用仅用于unprovisioned device与provisioner用于入网数据交互时使用。
Mesh Proxy Service
不但有provisioning service,Mesh GATT Services中还有一个叫Mesh Proxy Service,该服务主要就两个特征值:
mesh proxy data in (Write Without Response)
该特征值主要用于provisioner向node发送proxy pdus (不包括provisioning pdu)
mesh proxy data out (Notify)
该特征值主要用于node发送proxy pdus (不包括provisioning pdu)至provisioner
为了让上述的语句更加易于理解,我们可以查看下图中所述的mesh proxy service的工作原理:

从上面我们可以很清楚地了解到,Mesh Network PDU都可以通过mesh proxy data in这个特征值传送相应的PDU至node。当然,也可以通过mesh proxy data out这个特征值传输相应的PDU至provisioner;那么,这两个特征值除了上面提及的PDU之外,它还能传输哪些类型的PDU呢?显然,小编这么说那么就肯定是不止上述的两种类型PDU啦,对吧😄。其实,该mesh proxy service是可以传输如下几种类型的PDU:
- Network PDU
- Mesh Beacon
- Proxy Configuration
其中Mesh Beacon是Node-->provisioner发送mesh secure network beacon,而Proxy Configuration则是用于Proxy Client与Proxy Server之间交互Proxy配置信息,主要用于将目标地址新增至白名单或者黑名单,或从白名单和黑名单中移除,起到过滤的作用;显然,该服务的作用是用于入网之后,以上类型PDU的数据交互。
Proxy PDU
Proxy客户端通过Proxy PDU与Proxy服务端进行数据交互;如上所述,Proxy PDUs可以包含Network PDUs、mesh beacons、proxy configuration messages或者Provisioning PDUs。同时,单一的Proxy PDU可以包括一帧完整的数据,也可以是分包的数据;还有一点要注意!!!,Proxy PDU的长度大小是根据ATT_MTU来决定的;接下来,让我们看看Proxy PDU的真面目是怎么样的;但是,本章节主要讲解Provisioning PDUs。
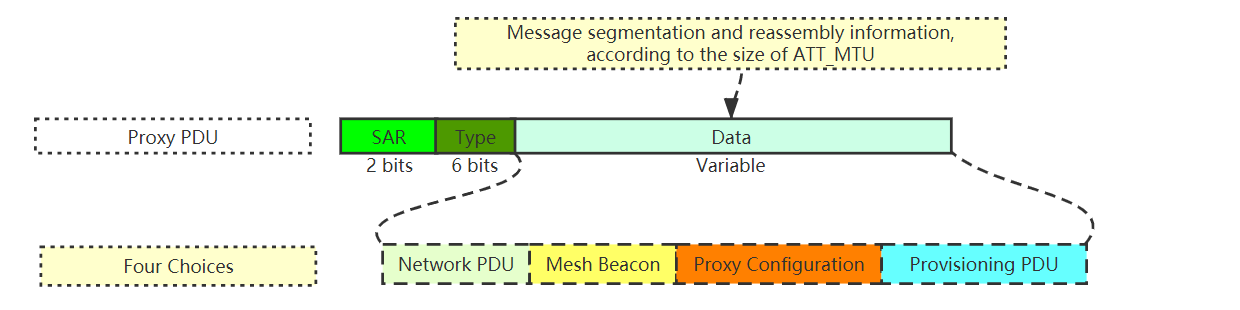
由上图可知,Proxy PDU由三个字段组成:
- SAR
- Type
- Data
SAR
刚开始看到这个字段,我想大多数人都很难理解其含义。因为,你很难猜测得到其全称是啥;其实,其全称就是Message segmentation and reassembly,当我看到全称之后就很容易理解啦;显然其是用于指示当前的数据包是一帧完整的包还是分包。那么,分包和完整包应该如何表述呢?
| Value | Description |
|---|---|
| 0b00 | Data field contains a complete message |
| 0b01 | Data field contains the first segment of a message |
| 0b10 | Data field contains a continuation segment of a message |
| 0b11 | Data field contains the last segment of a message |
从上表可知,完整的一帧包时就是0b00、分包的第一个帧包是0b01、中间的帧包都是0b10、最后的一帧则是0b11。这个时候问题又来了,上述还是太理论了,那么真实的数据是怎么样的呢?
完整的一帧
多个帧包


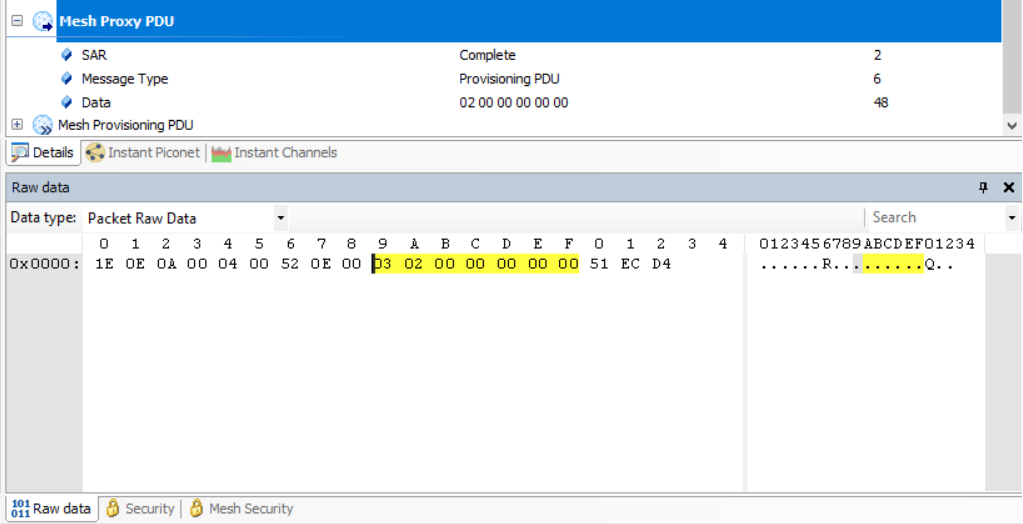
Type
这个字段就是表明当前携带的PDU是什么类型的,也就是我前面所说的Proxy PDU能传输哪几种类型的数据:
| Type | Name |
|---|---|
| 0x00 | Network PDU |
| 0x01 | Mesh Beacon |
| 0x02 | Proxy Configuration |
| 0x03 | Provisioning PDU |
Data
该字段根据Type的类型,然后再填充相应的数据。但是,入网的整个过程都是Provisioning PDU,而Provisioning PDU又分好几种类型:
| Type | Name |
|---|---|
| 0x00 | Provisioning Invite |
| 0x01 | Provisioning Capabilities |
| 0x02 | Provisioning Start |
| 0x03 | Provisioning Public Key |
| 0x04 | Provisioning Input Complete |
| 0x05 | Provisioning Confirmation |
| 0x06 | Provisioning Random |
| 0x07 | Provisioning Data |
| 0x08 | Provisioning Complete |
| 0x09 | Provisioning Failed |
| 0x0A-0xFF | RFU |
Provisioning PDU
该PDU的主要用于provisioner与new device的交互,具体的帧格式如下:
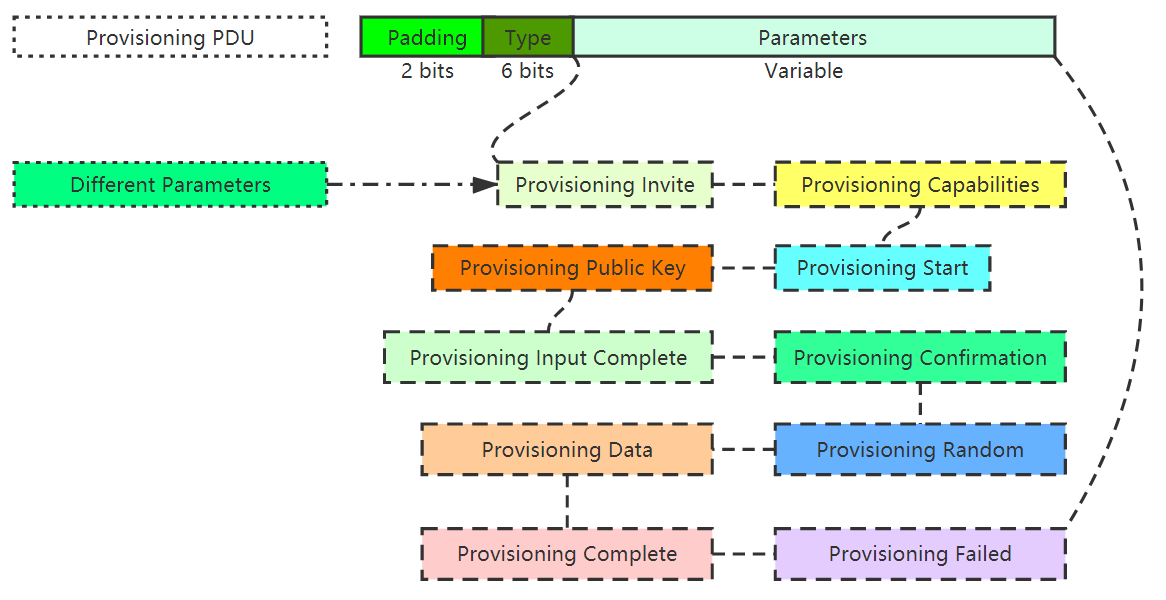
上图显示的就是整个Provisioning PDU的帧格式,包括整个入网过程所用到的所有帧类型。
Padding
固定为0b00,其他值被禁止使用;
Type
此处不再细述,详情可查看上述的Data章节;
Parameters
该字段则根据上述的Type,填充相应的参数;
发送Beacon信号
不管是入网了还是没有入网,设备均会向外发送Beacon信号。唯一的不同就是:
- 入网之后的设备发送出来的是Secure Network Beacon
- 未入网的设备则发送出来的是Unprovisioned Device Beacon
对上述Beacon帧格式的描述,本篇章不再细述;小编已经在上一篇章Mesh Beacon帧格式中讲解了。
邀请
这个动作是provisioner主动发起的,当其发现对端设备是unprovisioned device时,便会向未入网的设备发出邀请;而其包含了两个步骤:
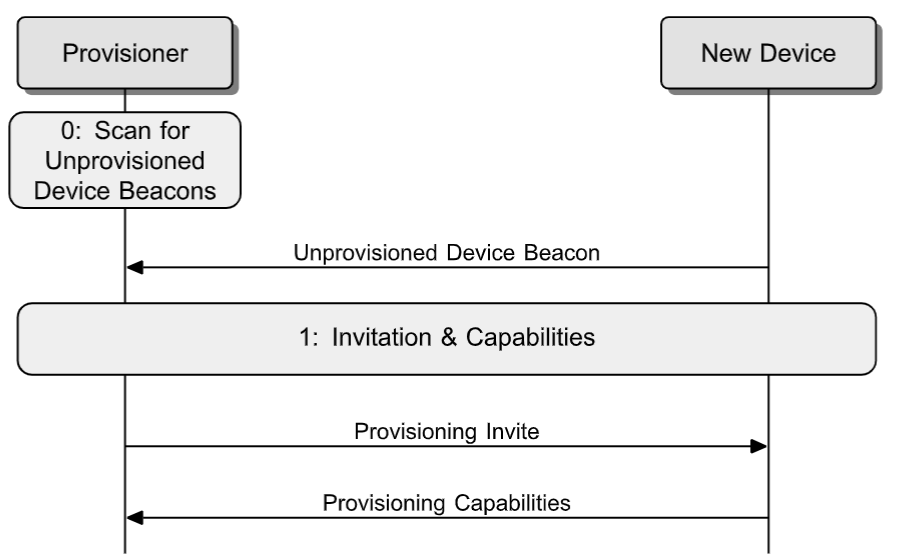
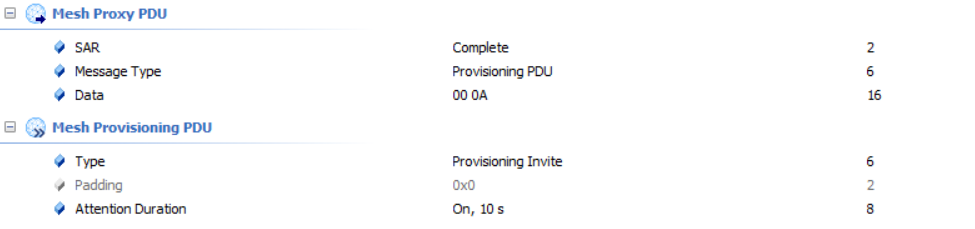
Provisioning Invite
首先,provisioner通过mesh proxy data in特征值以Write Command的形式写入Provisioning Invite PDU,该类型的帧内容仅包括attention time,就是给予new device一个时间值,然后做出任何可以引起周边事物注意的动作时长为attention time秒,具体的帧格式如下:
Provisioning Capabilities
该PDU是new device发给provisioner的,内容会比较复杂;主要是用于告诉provisioner我new device具备哪些能力,这些能力也就影响着后续的一序列动作,如公钥的交互、认证等等。那么它们具体是哪些内容呢?请看下表所述:
| Field | Size(octets) | Notes |
|---|---|---|
| Number of Elements | 1 | Number of elements supported by the device |
| Algorithms | 2 | Supported algorithms and other capabilities |
| Public Key Type | 1 | Supported public key types |
| Static OOB Type | 1 | Supported static OOB Types |
| Output OOB Size | 1 | Maximum size of Output OOB supported |
| Output OOB Action | 2 | Supported Output OOB Actions |
| Input OOB Size | 1 | Maximum size in octets of Input OOB supported |
| Input OOB Action | 2 | Supported Input OOB Actions |
由上表可知,涉及的内容主要集中在OOB的方式,有输入也有输出;那接下来我们就分别看看它们所表示的功能。

Number of Elements
显然这个字段所表示的是当前这个new device具备多少个元素,而且new device有且至少一个元素,至多255个。至于什么是元素?可以参考小编上几个章节写的什么是Element和Model
| Value | Description |
|---|---|
| 0x00 | Prohibited |
| 0x01–0xFF | The number of elements supported by the device |
Algorithms
顾名思义,该字段表示new device支持哪一种加密算法,然而目前为止,仅支持FIPS P-256 Elliptic Curve算法。后继SIG官方应该会推出更多的加密算法。
| Bit | Description |
|---|---|
| 0 | FIPS P-256 Elliptic Curve |
| 1-15 | Reserved for Future Use |
Public Key Type
该字段表示当前的new device支持什么类型的公钥。目前为止,仅支持OOB方式的公钥。这也就是说公钥可以通过OOB方式与provisioner进行交互。不知道读者还有没有印象,在我们的Mesh Beacon帧格式中有提及到OOB Information,那些信息就是告诉大家可以采用哪种方式来传递公钥。当然啦这也不强制要求,你也可以不用OOB的方式来传递公钥,而是使用随机生成的公钥。同时,公钥的长度取决于所选用的加密算法,这里我们有且仅能选择FIPS P-256 Elliptic Curve算法,即公钥的长度就是32字节 (本文所展示的Traces,均未采用OOB)。
OOB Information
Bit Description 0 Other 1 Electronic / URI 2 2D machine-readable code 3 Bar code 4 Near Field Communication (NFC) 5 Number 6 String 7 Reserved for Future Use 8 Reserved for Future Use 9 Reserved for Future Use 10 Reserved for Future Use 11 On box 12 Inside box 13 On piece of paper 14 Inside manual 15 On device Public Key Type values
Bit Description 0 Public Key OOB information available 1-7 Prohibited
Static OOB Type
同样的,这个字段所表述就是new device使用什么样类型的静态OOB用于后继的认证。跟Public Key Type一样,这也不是强制的,你也可以不采用静态OOB的方式认证。但是你可以在Firmware中定义可以存放16字节的静态OOB的数组;没错,静态OOB的最大长度是16字节。从本实例中的捉包Trace中,可以看到我们是有用于后继认证的静态OOB的,但是我们在入网时并没有使用它。
| Bit | Description |
|---|---|
| 0 | Static OOB information available |
| 1-7 | Prohibited |
Output OOB Size
从名字我们就可以猜测出,这个是输出OOB的大小;该字段主要是定义了可以输出(例如,显示出来或者说出来)数字或者字母时的位数;至于是输出字母、数字、字母数字是根据在Output OOB Action字段设置的情况决定的,那么有哪几种情况呢?让我们一起来看看:
- Output Numeric
- Output Alphanumeric
- 闪烁
- 蜂鸣
- 振动
那么讲到这里,可能读者会问 “这个输出OOB的大小最大是多少呢?”,这个答案我们可以在下表中找到。
| Value | Description |
|---|---|
| 0x00 | The device does not support output OOB |
| 0x01–0x08 | Maximum size of Output OOB supported by the device |
| 0x09–0xFF | Reserved for Future Use |
至于,Output Numeric和Output Alphanumeric的方式我们很好理解,根据Output OOB Size的大小输出相对应的位数;例如:Output OOB Size设置为7,那么输出的数字或者数字大写字母组合的位数就是7,如 “1234567”或者“123ABCD”,这里需要注意的是:“这些值必须全部都是字符串”;如果Output OOB Action字段中的值是上述的三个动作之一,new device会根据Output OOB Size的值从1~Output OOB Size的中随机选择一个数字,然后选中的动作响应此时的随机数的次数,provisioner间接获取得到这个随机数字,更多详情我们可以参照Authentication Method、Action、Size章节中的相关描述。
Output OOB Action
整个Output OOB Action如下表所示:
| Bit | Description | Data Type |
|---|---|---|
| 0 | Blink | Numeric |
| 1 | Beep | Numeric |
| 2 | Vibrate | Numeric |
| 3 | Output Numeric | Numeric |
| 4 | Output Alphanumeric | Alphanumeric |
| 5-15 | Reserved for Future Use | n/a |
Input OOB Size
这个跟上面的Output OOB Size基本上是一模一样的,无非就是将输出变为输入。另外,动作变成按压和拧。
| Value | Description |
|---|---|
| 0x00 | The device does not support Input OOB |
| 0x01–0x08 | Maximum size of Input OOB supported by the device |
| 0x09–0xFF | Reserved for Future Use |
Input OOB Action
同理,支持的输入OOB动作如下表所示:
| Bit | Description | Data Type |
|---|---|---|
| 0 | Push | Numeric |
| 1 | Twist | Numeric |
| 2 | Input Numeric | Numeric |
| 3 | Input Alphanumeric | Alphanumeric |
| 4-15 | Reserved for Future Use | n/a |
以上OOB相关的,除了公钥之外,均是用于后续的认证的方式提供了不同的方法。
交换公钥
经过邀请的步骤之后,provisioner已经知道new device具备哪些能力了,那么provisioner就会根据new device响应的能力进行相对应类型的公钥交换。还有一点,需要注事的是:如果响应的Provisioning Capabilities PDU中的加密算法provisioner不支持,则provisioner会选择它所支持的安全性最高的加密算法。那么,在交换公钥这个过程中它们两者又做了哪些事情呢?接下来让我们跟着小编魔鬼的步伐瞧瞧:
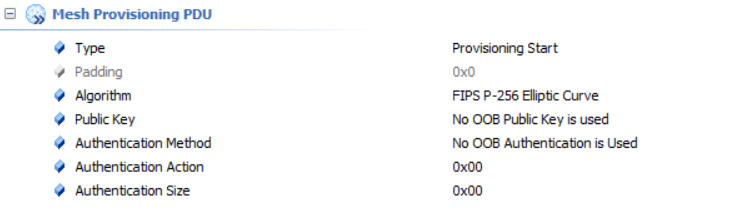
Provisioning start
由上述的交换公钥可以很清楚地了解到,该PDU由provisioner根据Provisioning Capabilities PDU中的选项,发送相应的内容给new device,告诉它接下来要采用哪种方式进行公钥交换以及采用何种认证方式。同时,new device收到该PDU之后,它会将Attention Timer设置为0。具体的帧格式如下表所示:
| Field | Size(octets) | Notes |
|---|---|---|
| Algorithm | 1 | The algorithm used for provisioning |
| Public Key | 1 | Public Key used |
| Authentication Method | 1 | Authentication Method used |
| Authentication Action | 1 | Selected Output OOB Action or Input OOB Action or 0x00 |
| Authentication Size | 1 | Size of the Output OOB used or size of the Input OOB used or 0x00 |
以上描述了该PDU各个字段的含义,那么在真实的物理世界中它们又是以什么方式体现的呢?
是不是跟上述表格中的内容一模一样?所以说SIG Mesh也不是什么魔鬼,它们也是有标准可循的。
Algorithm
很明显这个字段用于描述采用什么类型的加密算法,但是目前似乎也没得选,只能选择FIPS P-256 Elliptic Curve。
| Value | Description |
|---|---|
| 0x00 | FIPS P-256 Elliptic Curve |
| 0x01–0xFF | Reserved for Future Use |
Public Key
该字段并不是用来填充Public Key内容的,而是用来表示是否使用OOB方式的Public Key;如果是,那么就使用OOB的方式传入Public Key内容 (使用FIPS P-256 Elliptic Curve加密算法的话就是32字节);否则,随机生成。具体的描述如下:
| Value | Description |
|---|---|
| 0x00 | No OOB Public Key is used |
| 0x01 | OOB Public Key is used |
| 0x02–0xFF | Prohibited |
那么,使用和不使用OOB Public Key的区别在哪里呢?我们可以查看下图所示:
No OOB Public Key is used
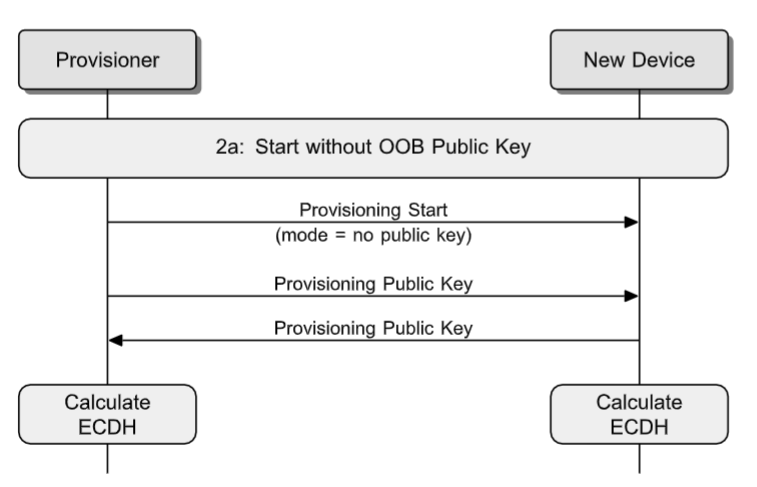
由上图可知,如果不使用OOB方式的公钥,那么公钥由provisioner和new device各自产生并相互交换;
OOB Public Key is used
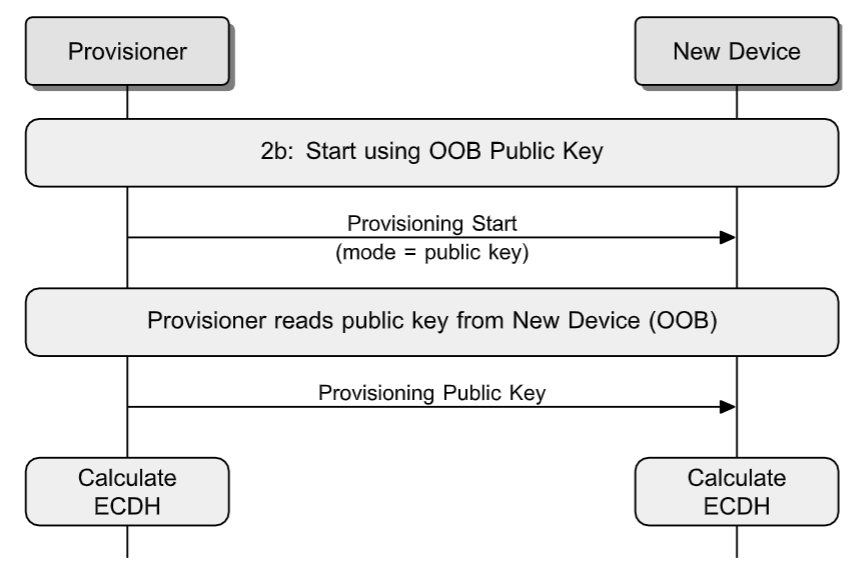
如果是使用了OOB方式的公钥,那么provisioner通过OOB的方式从new device获取得到公钥,然后provisioner自已生成一个公钥再传送给new device;而new device此时不用再传公钥给provisioner了,因为provisioner已经通过OOB的方式获取得到new device的公钥了;
不管是provisioner还是new device都要检验公钥的有效性,如果有效,则使用公钥通过下面的公式计算得出ECDHSecret:
ECDHSecret = P-256(private key, peer public key)
否则此次配置入网失败。
Authentication Method、Action、Size
接下来的这几个字段跟上述的Static OOB Type、Output OOB Action、Input OOB Action是相互呼应的,这也就是说该字段用根据new device响应的Provisioning Capabilities PDU内容,填充相对应的内容,具体的Authentication Method的内容如下表所示:
| Value | Description |
|---|---|
| 0x00 | No OOB authentication is used |
| 0x01 | Static OOB authentication is used |
| 0x02 | Output OOB authentication is used |
| 0x03 | Input OOB authentication is used |
| 0x04-0xFF | Prohibited |
根据上表的内容,那么就有如下几种组合:
0x00
Authentication Action和Size字段的内容均为0x00,如Provisioning start章节中的截图所示;
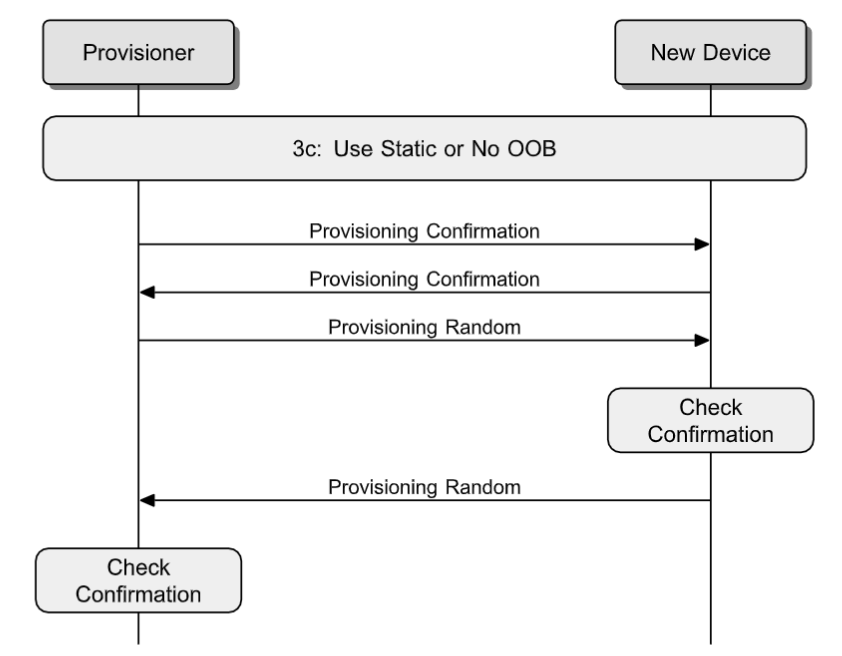
我们可以从上述的UML图可以清楚地看到,如果使用No OOB的方式的话,就没有了Input和Output的过程,我们也可以毫不夸张地说这种情况是没有经过认证的,因为此时的authentication Value全是0x00。双方直接进行Provisioning Confirmation PDU交互,那么该PDU是什么呢?我们可以在下面的Provisioning Confirmation找到答案;
0x01
同样的,Authentication Action和Size字段的内容也是均为0x00,跟上面唯一不同的是此时使用的是静态的OOB方式,即在Firmware中提前定义好16字节的静态OOB数组,对于这一点,我们在上面的Static OOB Type已经描述过了;具体的流程交互同上图所示;
0x02
Authentication Action的内容由下表决定:
Value Description 0x00 Blink 0x01 Beep 0x02 Vibrate 0x03 Output Numeric 0x04 Output Alphanumeric 0x05-0xFF Reserved for Future Use Authentication Size的内容由下表决定:
Value Description 0x00 Prohibited 0x01–0x08 The Output OOB Size to be used 0x09–0xFF Reserved for Future Use
基本上,跟Output OOB Action与Output OOB Size的内容是一模一样的。
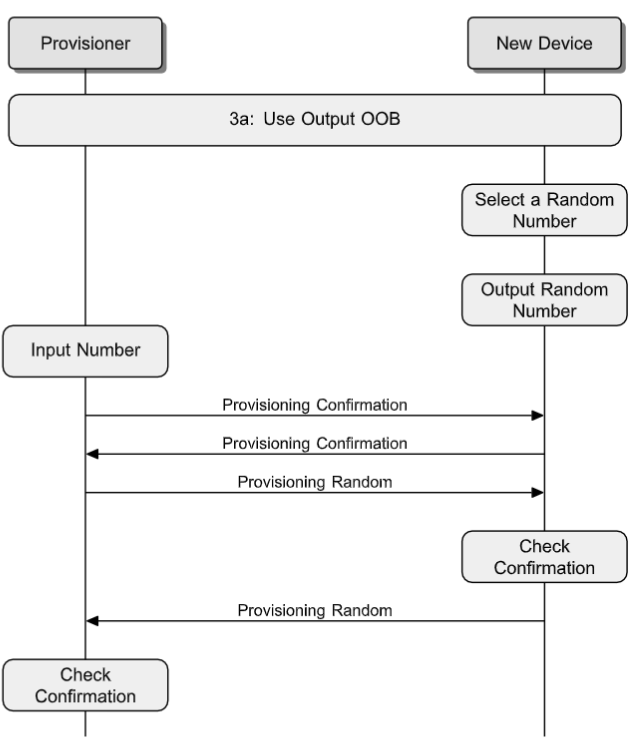
如果是执行到这个步骤,小编觉得还是觉得有必要去澄清一下的;对于如果Authentication Action是Blink、Beep以及Vibrate其中的一个,那么是由new device从1-Output OOB Size的中随机选取一个数字并通过所选中的Action去输出这个数字;例如,new device是一个包含LED指示灯的门锁,那么其Authentication action就是Blink,而其输出数字的方法则是通过闪烁的次数去向Provisioner传达new device从1-Output OOB Size的中选中的随机数;如果authentication action是Output Numeric或者Output Alphanumeric,那么new device会根据authentication size的值输出相对应个数的大写字母或者数字或者字母和数字混合。
0x03
Authentication Action的内容由下表决定:
Value Description 0x00 Push 0x01 Twist 0x02 Input Numeric 0x03 Input Alphanumeric 0x04-0xFF Reserved for Future Use Authentication Size的内容由下表决定:
Value Description 0x00 Prohibited 0x01–0x08 The Input OOB Size to be used 0x09–0xFF Reserved for Future Use
同样的,跟Input OOB Action与Input OOB Size的内容是一模一样的。
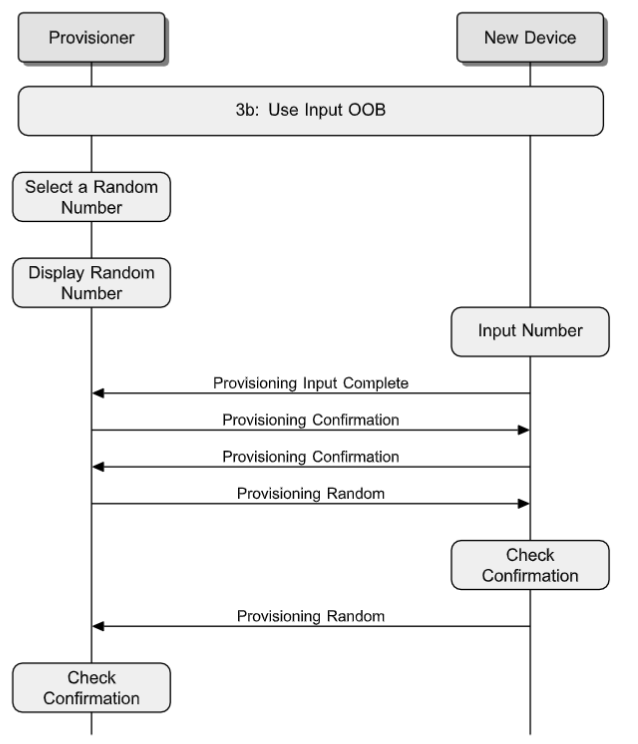
上述的流程所传达的含义跟上面的Output OOB authentication是基本一致的。只是输出变成输入而已;
这里也就再次证明Provisioning Capabilities PDU中的内容决定了公钥类型和认证的方式;当然啦,这里还没有到认证的阶段,只是Provisioner告诉new device,我根据你的Provisioning Capabilities PDU反馈,决定进行什么类型方式的认证。
Provisioning Public Key
此时,Provisioner与new device两者相互交换要在ECDH计算所用到的公钥,此PDU格式如下所示:
| Field | Size(octets) | Notes |
|---|---|---|
| Public Key X | 32 | The X component of public key for the FIPS P-256 algorithm |
| Public Key Y | 32 | The Y component of public key for the FIPS P-256 algorithm |
认证
交换公钥中的章节可知,其仅仅是进行了公钥的交互以及认证方式的选定。但是,还未经过认证的动作。那么认证的环节又由哪几部分组成呢?
Provisioning Input Complete
当new device完成认证数字的输入之后,会向provisioner发送该PDU;然而,流程是怎么样的呢?我们可以参考Authentication Method、Action、Size章节中0x03所示的内容;同时,我们也要注意,该PDU是不携带任何参数的。
Provisioning Confirmation
Provisioner与new device会各自将目前为止所有已经交互过的PDU (包括发送的和接收到的,如Provisioning_Invite_PDU、Provisioning_Capabilities_PDU、Provisioning_Start_PDU、Provisioning_Public_key_PDU,但是要注意的是仅仅是PDU不包括帧头的类型,如Invite、Capabilities等等),包括OOB认证值以及还未发送出来的随机数,将它们加密之后的哈希值发送对端设备,以便进行下一步的确认,但是该PDU名虽说是confirmation,实质其还不能完全地确认。它们仍然需要知道对方的随机数方可确认发送的Confirmation是否匹配。该PDU的帧格式比较简单,如下所示:
| Field | Size(octets) | Notes |
|---|---|---|
| Confirmation | 16 | The values exchanged so far including the OOB Authentication value |
Provisioning Random
如Provisioning Confirmation所述,只有当Provisioner与new device双方收到该PDU才能校验确认值。同样,该PDU也是很简单:
| Field | Size(octets) | Notes |
|---|---|---|
| Random | 16 | The final input to the confirmation |
到此,认证工作已经完成了;那么,provisioner可以给new device发放配置数据了。
配置数据分发
当进行这个步骤时,我们离入网成功只剩下最后一步了。只要new device获取得到配置数据,它就可以由new device向node的华丽转身。那么该步骤主要是做了哪些动作呢?
Provisioning Data
通过认证之后,provisioner会将provisioning data发给new device,但是所有的数据都是通过会话秘钥加密的,而会话秘钥又派生于我们上述所说的ECDHSecret。那么该PDU包含哪些内容呢?我们先来看看帧格式是怎么样的。
| Field | Size(octets) | Notes |
|---|---|---|
| Encrypted Provisioning Data | 25 | An encrypted and authenticated network key, NetKey Index, Key Refresh Flag, IV Update Flag, current value of the IV Index, and unicast address of the primary element |
| Provisioning Data MIC | 8 | PDU Integrity Check value |
首先,映入眼帘的是加密且认证过的网络密钥以及其索引等等数据,这些全部是我们将会在SIG Mesh使用的通行证啊。那么小编在这里抛出一个问题 “如果某个已经入网的设备坏掉了,那么同样跟该设备一模一样的设备是否可以直接将这些数据备份下来,然后直接写入到这个还未入网的设备,从而达到快速加入一个指定的SIG Mesh网络呢?” 至于,这个答案我们后继会开专栏揭晓😄。接下来,让我们看看这些加密认证的数据具体情况是什么:
| Field | Size(octets) | Notes |
|---|---|---|
| Network Key | 16 | NetKey |
| Key Index | 2 | Index of the NetKey |
| Flags | 1 | Flags bitmask |
| IV Index | 4 | Current value of the IV Index |
| Unicast Address | 2 | Unicast address of the primary element |
Network Key
这个毫无疑问就是我们的网络秘钥了;
Key Index
这个又是什么玩意呢?由于网络密钥的长度是16字节,如果直接在SIG Mesh网络中传输16字节的网络密钥,有点不太现实。因为,原本就能占用的帧数据的位置就不够,所以引入了网络密钥索引这个概念,当我们要将网络密钥传输给其他节点,只需要要传网络密钥索引即可。通过个索引我们可以在网络密钥列表获取相对应的网络密钥;更多的细节,读者可以参考SIG Mesh Spec的4.3.1.1章节;
Flags
该字段会比较好理解,无非就是IV Update和Key Refresh相关:
Bits Definition 0 Key Refresh Flag (0: False 1: True) 1 IV Update Flag (0: Normal operation 1: IV Update active) 2–7 Reserved for Future Use 该内容我们在Mesh Beacon帧格式也有提及;
IV Index
这个也同样好理解,表示当前的IV索引值;其具备如下两个功能:
- 用于应用层和网络层的身份验证和加密
- 当Sequence Number快要溢出时,发起IV Update程序,让IV Index值增加,从而防止Sequence Number被重复使用
Unicast Address
该内容表示provisioner分配给当前设备首要元素的单播地址;
Provisioning Complete、Failed
这两个概念就更好理解了,如果成功接收到并处理provisioning data,那些new device就会向provisioner发送provisioning complete PDU,否则发送provisioning failed PDU。需要大家注意的是前者是没有携带任何的参数,而后者是携带有具体的错误码 (1个字节的长度),也就是说我在哪个环节出现问题了,详情如下所示:
| Value | Name | Description |
|---|---|---|
| 0x00 | Prohibited | Prohibited |
| 0x01 | Invalid PDU | The provisioning protocol PDU is not recognized by the device |
| 0x02 | Invalid Format | The arguments of the protocol PDUs are outside expected values or the length of the PDU is different than expected |
| 0x03 | Unexpected PDU | The PDU received was not expected at this moment of the procedure |
| 0x04 | Confirmation Failed | The computed confirmation value was not successfully verified |
| 0x05 | Out of Resources | The provisioning protocol cannot be continued due to insufficient resources in the device |
| 0x06 | Decryption Failed | The Data block was not successfully decrypted |
| 0x07 | Unexpected Error | An unexpected error occurred that may not be recoverable |
| 0x08 | Cannot Assign Addresses | The device cannot assign consecutive unicast addresses to all elements |
| 0x09 | RFU | Reserved for Future Use |
至此,整个入网流程完成。搞了这么多步骤就是为了获取得到最终的provisioning data的内容。这也意味着该篇节也最终完稿了,可能有人觉得这个太复杂了,其实小编写完本篇文章也快“流泪”了,为了显现完整的入网过程和各个细节,足足写了快一个星期了!!!不出意外的话,应该是全网最详细的入网流程说明了。